![]()
In this “Microsoft Copilot Studio” article, we will learn how to download Microsoft Copilot Studio and setup and configure it in the Power Platform environment and Microsoft Visual Studio. I will also show you how to get started with your first Copilot project using the Copilot Studio.
As Microsoft Copilot is one of the new trending AI-based tools, there will be many questions in your mind about this tool. Here I have covered all frequently asked questions and their answers about Microsoft 365 Copilot or Copilot Studio, so it is highly recommended to go through these questionnaires and answers before you start exploring the Copilot Studio tool.
Top 30 Microsoft 365 Copilot FAQ: Your Questions Answered
What is Microsoft Copilot Studio?
The Microsoft Copilot Studio was announced at the Microsoft Ignite 2023 conference, and it was one of the key announcements from Microsoft Ignite 2023. Using the Copilot feature, we can develop many products in simple ways. For example, if you just describe your Power Automate flow requirements, the copilot will automatically create your necessary actions. Now, with the Copilot Studio, we can develop a custom plugin for our websites, including SharePoint sites, so that users can find their content the way ChatGPT accepts user prompts and generates answers as a chat. I will show you this demo using the existing Power Platform environment, where I will show you how to create a ChatGPT version of Power Platform Chatbot using the Microsoft Copilot Studio.
Microsoft Copilot Studio is a powerful integrated development environment (IDE) that leverages the capabilities of GitHub Copilot, an AI-powered code completion tool. This innovative tool, developed by GitHub in collaboration with OpenAI, assists developers by suggesting whole lines or blocks of code as they type, making the coding process more efficient and productive. In this article, we will guide you through the process of downloading and configuring Microsoft Copilot Studio step-by-step in two ways. 1) Using the Microsoft Visual Studio Tool; and 2) Using the existing Power Platform Environment.
Microsoft Copilot in Visual Studio: Download and Configure
Following are the steps to configure Microsoft Copilot in Visual Studio:
Step 1: Ensure Prerequisites are Met
Before you start the download and configuration process, make sure that your system meets the prerequisites for Microsoft Copilot Studio. Ensure that you have a compatible operating system and a reliable internet connection.
Step 2: Install Visual Studio Code
Microsoft Copilot Studio is an extension for Visual Studio Code, a popular, free, and open-source code editor. If you don’t have Visual Studio Code installed, visit the official website (Visual Studio Code) and download the latest version suitable for your operating system. Follow the installation instructions provided.
Step 3: Open Visual Studio Code
Once Visual Studio Code is installed, open the application on your computer. If you are launching it for the first time, take a moment to familiarize yourself with the interface.
Step 4: Install GitHub Copilot Extension
To use Microsoft Copilot Studio, you need to install the GitHub Copilot extension. In Visual Studio Code, click on the Extensions view icon on the sidebar or press Ctrl + Shift + X (Windows/Linux) or Cmd + Shift + X (Mac) to open the Extensions view. Search for “GitHub Copilot” in the Extensions view search box, and click on the install button next to the GitHub Copilot extension.
Step 5: Sign in to GitHub
GitHub Copilot requires a GitHub account for authentication. If you don’t have a GitHub account, you’ll need to sign up for one. If you already have an account, click on the GitHub icon in the activity bar on the side of the window and sign in with your credentials.
Step 6: Configure GitHub Copilot
Once signed in, GitHub Copilot may prompt you to configure some settings. Follow the on-screen instructions to set up your preferences, such as code styles and keyboard shortcuts.
Step 7: Start Coding with Copilot
With GitHub Copilot installed and configured, you can start using it immediately. Open a new or existing code file, and as you start typing, GitHub Copilot will suggest code completions based on the context.
Microsoft Copilot Studio in Power Platform Environment
To download and configure the Microsoft Copilot Studio in your existing tenant, we need to follow the below steps:
Step 1: Subscribe to Microsoft Copilot
If you don’t have your Microsoft Developer Programme Free Subscription, create a trial tenant by referring to this article: Create Free Microsoft 365 developer program account step by step.
To sign up for a Microsoft Copilot Studio trial, click on this Microsoft Copilot Sign Up link.
You will get the below Microsoft Copilot Studio sign up screen.

Enter your Microsoft Email ID.
If you click on the “Learn More” link, it will show you what types of email you should enter.

Click on the Next button.

In the next screen, select your country and enter your mobile number.
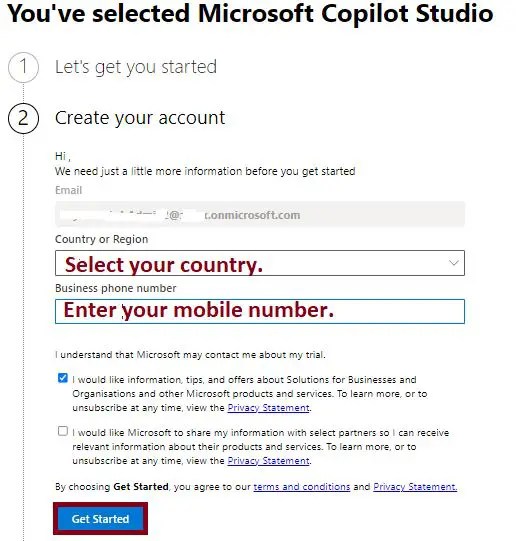
Click on the “Get started” button.

Then, it will take you to the Microsoft Copilot Studio bot list screen.
In this screen, choose your country or region.

Once you click on the “Get started” button, we can see the below message:

Click on the “Done” button. That’s it; we are done with the Microsoft Copilot Studio sign-up process. Now, we will move on to how to get started with the Copilot project, or, in other words, how to create my first Copilot project for my SharePoint site.
Getting started with Microsoft Copilot Studio
In this section, I will show how to get started with Microsoft Copilot Studio. In this demo, I will create a sample Copilot project that will read data from the SharePoint Online site.
Click on the “Create a copilot” link.
Enter your copilot name.
Select your coplilot language.
Entering your site URL from your Coplilot prompt will read the data. Here I have entered one of the SharePoint Online sites.

Once you click on the “Create” button, we will get the below message:
“Thanks, we’re setting up your copilot.”

This will take some time to complete. That’s it; we are done with the first Copilot plugin or project.
In the next screen, we can see “New features in Microsoft Copilot Studio”, This step is optional; you can click on the “Skip” button or keep on clicking on the “Next” button till the end to see what those new features are.

For my surprise, I have kept clicking on the “Next” button to see what those new features are. Here are those new features.
Intelligent authoring and copilot answers
Build smarter copilots more quickly with intelligent authoring and GPT-boosted responses from your own website.

Elevate your message
Add variations, images, videos, and quick replies. Collect information from your users with interactive adaptive cards.

Expand your capabilities
Use variables together with Power Fx expressions to manage sophisticated logic.

Click on the “Done” button.
Set up your generative AI
Give your copilot knowledge to chat over. Point to websites, internal SharePoint, files, and more – and your copilot can instantly answer questions over your data. Learn more

Click on the “Go to Generative AI” button.
Let’s understand what the generative AI feature offers.
Generative AI
“Enable intelligent features in your copilot. This feature runs on Azure OpenAI service and Bing Search. You consent to your data flowing outside your organization’s compliance and geo boundaries. By using the AI features labeled preview below, you agree to the supplemental preview terms. See preview terms. For other AI features, you agree to the supplemental terms. See supplemental terms.
Generative AI is premium feature and can be enabled or managed by your administrators. See pricing tiers.
Learn more about responsible AI at Microsoft.
Boost conversational coverage with generative answers
Dynamically generate answers in real time based off of content you choose, like external websites, SharePoints, OneDrive locations, or custom data sets. Let your users converse back-and-forth with your bot in response to unanticipated questions.
Generating responses using AI doesn’t guarantee accuracy or relevance. This feature runs on Azure OpenAI service.
Enabling generative answers will add Conversational boosting topic allowing your bot to respond to unknown intents using your connected data sources using the Create generative answers node

Test Copilot Studio Project
Now open the test copilot chat screen, you can see the below message:
“Hello, I’m Copilot – SharePoint Demo, a virtual assistant. Just so you are aware, I sometimes use AI to answer your questions. How can I help?”
Then, you type something related to SharePoint Online site content (the site you have configured in the Generative AI section). The prompt will process your question and get the result from your configured SharePoint Online site. This is how the Copilot bot works. But in my case, I have the authentication issue; let’s fix that.
“Error Message: Authentication is not configured for this bot, error code: AuthenticationNotConfigured Conversation ID”
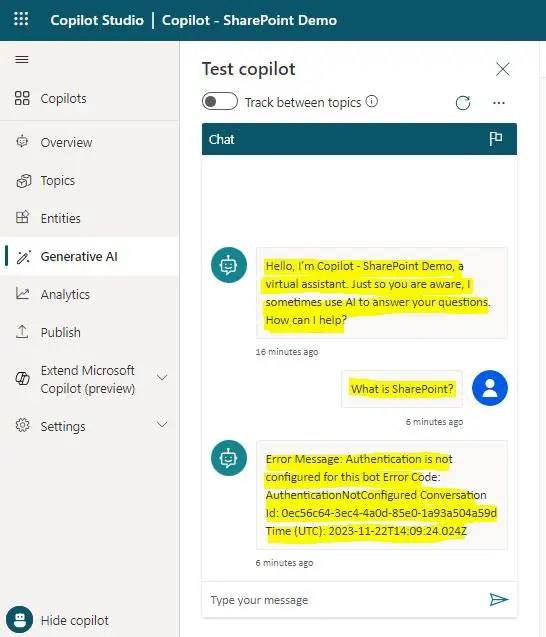
For Authentication issue refer to this URL: Authentication is not configured for this bot
Configure Authentication in Copilot ChatGPT
You can get the authentication screen from the left side panel security menu.
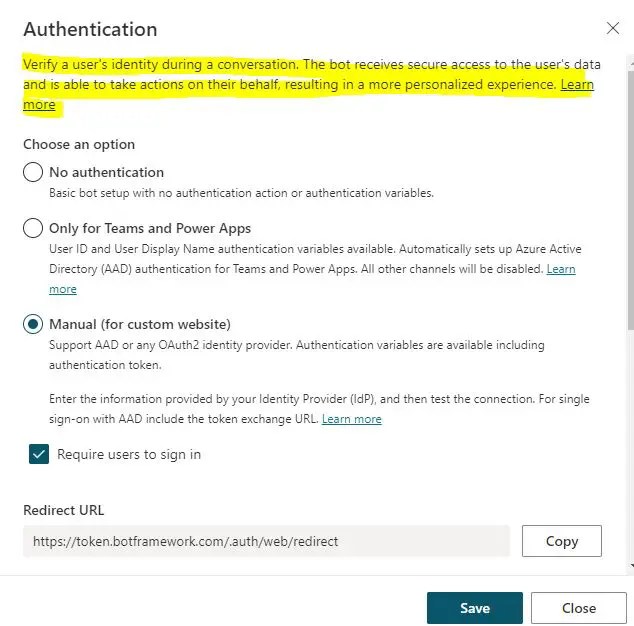
The authentication process verifies a user’s identity during a conversation. The bot receives secure access to the user’s data and is able to take actions on their behalf, resulting in a more personalized experience. Learn more
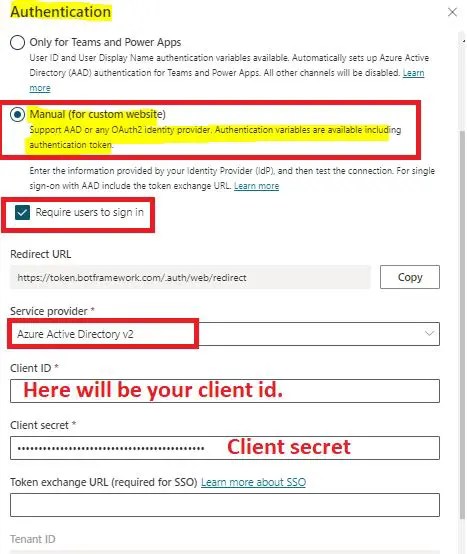
By default, in Copilot, the authentication method is selected as “No Authentication” For the above issue, we need to select “Manual (for a custom website).”
Select the service provider as “Azure Active Directory v2“, enter your SharePoint site client ID and client secret, and get it by referring to this article: In 4 steps access SharePoint online data using postman tool
Once, click on the “Save” button, we will get the below warning message:
“Save this configuration?
Changes to authentication settings affect the bot’s behavior and access to channels.
For the new authentication setting to take effect, publish the bot.
Authentication variables are available to use in topics.
Only users that you’ve shared the bot with can use it. Learn more about sharing bots”
Click on the “Save” button.

Click on the Save button.
Publish Copilot Project
Excited to go live with your copilot and Microsoft Copilot plugins? Publish both in one go. Then, try out your copilot on a website and configure channels to meet your users where they are.
Now is the time to publish your copilot project. Click on the “Publish” button.

Once we click on the “Publish” button, we can see the publishing status as like below:

Test your copilot ChatGPT
Again, type something on your chat screen, and now it will ask you to log in. Then, you can continue to test your copilot, ChatGPT. Unfortunately, I could not successfully login; it was throwing some other errors once I clicked on the “Login” button.
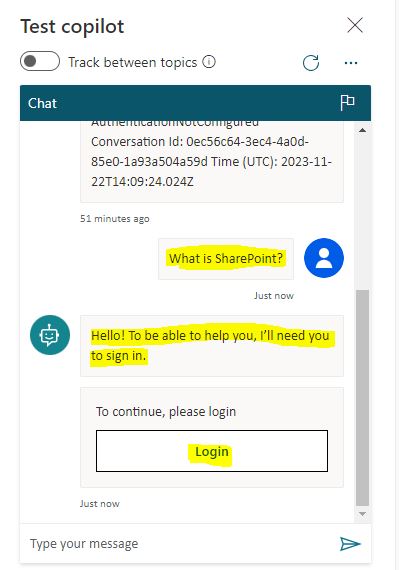
Once, I am clicking on the “Login” button, getting the below “Sign in” error:
“Sign in Sorry, but we’re having trouble with signing you in. AADSTS90036: An unexpected, non-retryable error stemming from the directory service has occurred.”

The error I am getting may not be in your tenant; let me know your result in the comment section. And I will further investigate this error and update it here.
Note – Update:
The above issue has been fixed; refer to this custom authentication in Copilot Studio article where I am able to successfully test the Copilot Chatbot with the custom authentication mode.
New updates about Copilot from Microsoft
In this section, I will be updating the latest updates about Copilot from Microsoft over a period of time as and when Microsoft makes any new announcements about Copilot:
15 Jan 2024:
- Copilot for Microsoft 365 is now generally available for small businesses with Microsoft 365 Business Premium and Business Standard Customers can purchase between one and 299 seats for $30 per person per month.
- We’re removing the 300-seat purchase minimum for commercial plans and making Copilot available for Office 365 E3 and E5 customers (A Microsoft 365 license was previously required).
- Commercial customers can now purchase Copilot for Microsoft 365 through our amazing network of Microsoft Cloud Solution Provider partners.
- Last month, we also announced eligibility of Copilot for Microsoft 365 for education faculty and staff.
The above update source is: Bringing the full power of Copilot to more people and businesses
29 Feb 2024: Copilot in OneDrive: A New Wave of File Interaction
The copilot will be available in OneDrive; now that this is in preview mode, Microsoft will start rolling it out in late April 2024. The source of this announcement is here: Copilot in OneDrive: A New Wave of File Interaction
Extend Copilot Studio Trial License after 30 days
Once you complete 30 days with your trial licence in Copilot Studio, it will expire automatically, but don’t worry, there is a way to extend the Copilot Studio Trial Licence without paying anything for your learning. For this, refer to this article: How To Extend Copilot Studio Trial License: Your Microsoft Copilot Studio Trial Has Expired
Summary: Getting started with Microsoft Copilot Studio
Thus, in this article, we have learned about Microsoft Copilot Studio and how to get started and create a chatbot called ChatGPT using the Microsoft Copilot Studio tool, as well as how to enable Copilot in the Microsoft Visual Studio tool.
Microsoft Copilot Studio, powered by GitHub Copilot, is a revolutionary tool that significantly enhances the coding experience. By providing intelligent code suggestions, it boosts productivity and helps developers write code more efficiently. By following this step-by-step guide, you can easily download and configure Microsoft Copilot Studio, integrating it seamlessly into your development workflow. Explore the capabilities of Copilot and enjoy a more streamlined coding experience.
See Also: Artificial Intelligence Articles
You may also like the following artificial intelligence articles:
- Beyond ChatGPT: 50+ Must-Try Free AI Tools and Websites
- ChatGPT or Google Bard: Which AI Language Model Wins?
- ChatGPT and Power Automate: Boost Your Power Automate Productivity with ChatGPT Integration
- ChatGPT and SharePoint: The Top 5 Ways ChatGPT Can Improve Your SharePoint Workflow
If you found this article helpful and enjoyed it, please consider sharing it with your friends and colleagues. Please don’t forget to subscribe to our site to receive our latest articles directly in your inbox. 🙂

