

 By
By 
SharePoint Button to Trigger Power Automate Flow: In this blog, we will extend the trigger power automate for a selected item in SharePoint Online. In that article, we learned how to create a Power Automate flow for a selected item in SharePoint Online and how to trigger it manually. In this article, we will add a custom button to the list that will be displayed next to each list item. Using the button click, the user can trigger the action as per their needs.
Generally, businesses need automated cloud flow, and the flow should be triggered conditionally, but sometimes businesses need manually triggered cloud flow from the front end, that is, from a SharePoint Online list or document library.
Introduction: SharePoint Button to Trigger Power Automate Flow
In this article, we will learn the following:
- How to add a button to a SharePoint Online list or document library
- How to customize the button in a SharePoint Online list or document library
- How to trigger the Power Automate flow using a button click from a SharePoint list or document library
How to add a button to a SharePoint Online list or document library
To add a button to a SharePoint Online list or document library, follow the below steps:
- Create a single line of text and name it as per your needs. For this demo, we have named it “TriggerFlow Button”, This is column internal name.
- Format the column using the JSON formatting.
This is the column we have created:

How to customize the button in a SharePoint Online list or document library
To customize the column or convert the text column to a button, we need to use JSON formatting. To do that, follow the below steps:
- Select the column drop-down menu.
- Hover to column settings
- From the right side, click on the “Format this column link.
Here is the visual representation of the steps:

In the JSON box, copy paste the below code:
{
"$schema": "https://developer.microsoft.com/json-schemas/sp/v2/column-formatting.schema.json",
"elmType": "button",
"txtContent": "Click me to Trigger this flow",
"customRowAction": {
"action": "executeFlow",
"actionParams": "{\"id\": \"5ade6a5f-d853-4f4d-9a3d-ee5aceaf223c\",\"headerText\":\"Power Automate Flow Execution\",\"runFlowButtonText\":\"Execute Now\"}"
},
"style": {
"background-color": "#008082",
"color": "white",
"border-radius": "0 15px",
"visibility": "=if(([$ItemCreatedChannel] == 'Power Automate'),'hidden','visible')"
}
}
Code Explanation:
- From the above code, flow ID is very important and mandatory, as shown in bold in the “actionParams” You need to replace this flow ID with yours. How to get flow ID; see below.
- “txtContent”: It should be your button text.
- “visibility”: This is an optional parameter, but it is very much needed in the business scenario. In this demo, we are hiding this button if the “ItemCreatedChannel” value is “Power Automate”.
Note:
- Using the JSON formatting we can also show and hide columns in SharePoint Online conditionally.
How to get flow ID from Power Automate?
To get the flow ID from Power Automate, follow the below steps:
- Login to your Power Automate environment.
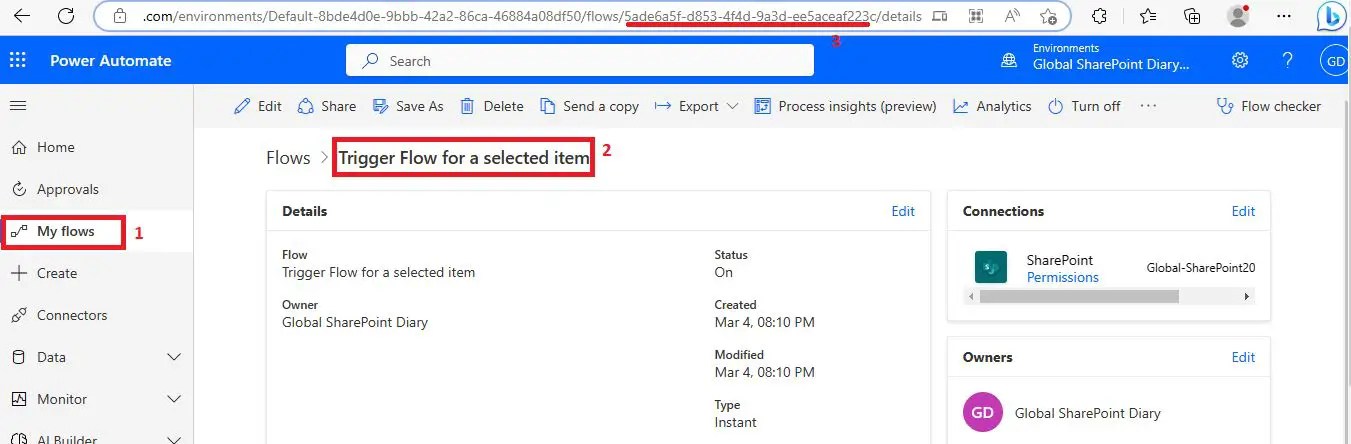
- Click on the “My Flows” link from the left-side panel.
- Find and click on the flow for which you need the flow ID.
- At the URL bar, between the flows and details, there is a GUID value, which is your flow id.
- Copy this flow id and add to the JSON as shown above.
Here is the visual representation of the steps:
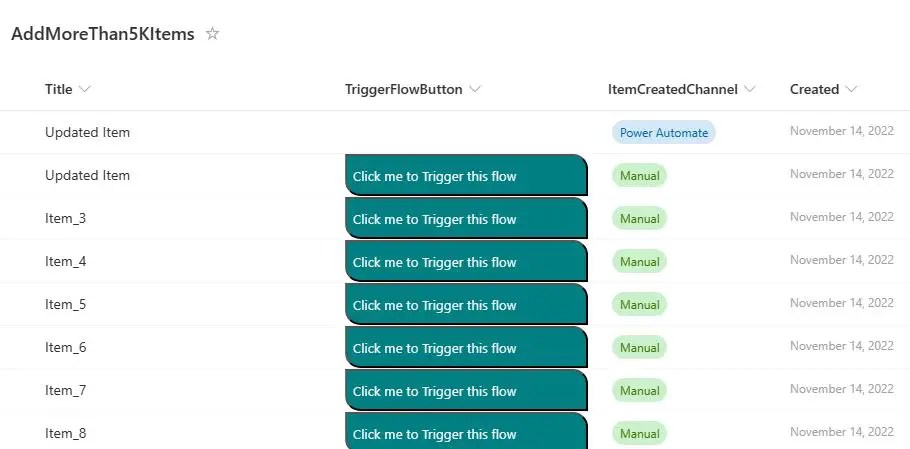
Finally, once you have added the updated JSON code to your column, we can see the button, which looks something like below:
Note:
- As explained above, this button will be hidden if the “ItemCreatedChannel” (which is a choice type column) value is Power Automate; that’s why it is not showing for Power Automate.
Demo: How to trigger the Power Automate flow using a button click from a SharePoint list or document library
This flow will just update the “ItemCreatedChannle” value to “Power Automate” and the Title column value to “Updated Item”. This is just a proof of concept, which you can implement as per actual business needs.
So, let’s trigger the flow for the third item.
Select the item for which you want to trigger the flow.
Click on the flow trigger button.
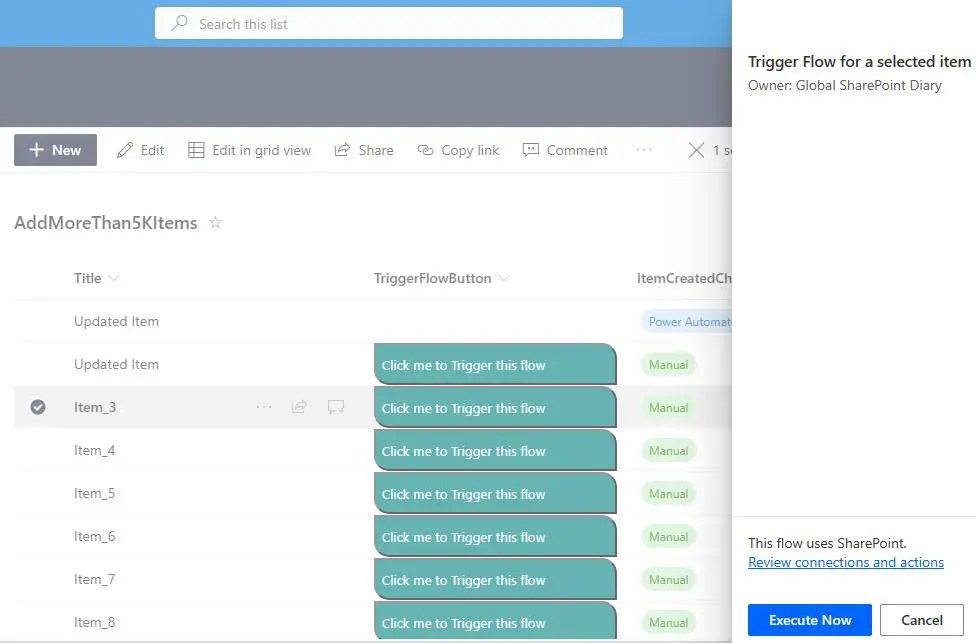
In right side panel, you can see your flow.
Click on the “Execute Now” button.
You can see your flow trigger status message below:
“Started flow “Trigger flow for a selected item (here it should be your flow name)”
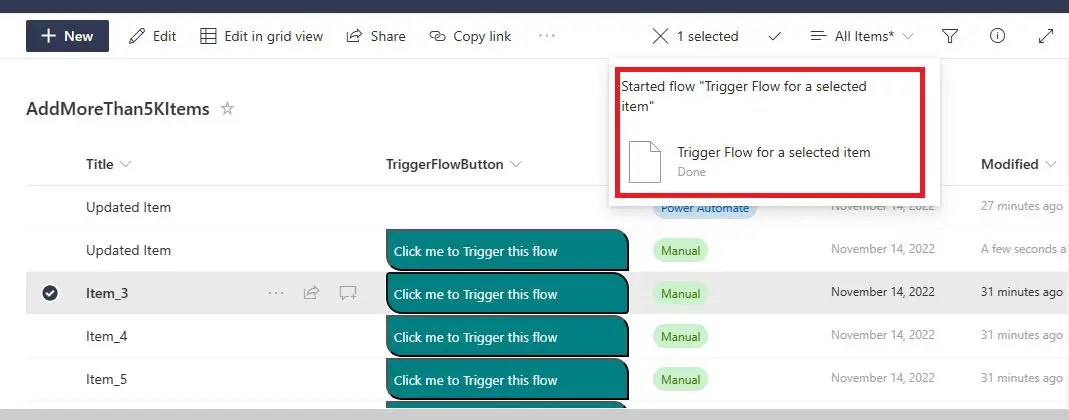
Now, refresh the list URL, you can see that your flow has processed your needed functionality, here it has updated the Title and “ItemCreatedChannel” columns.

Note:
- We can see that the flow has updated the Title column value as “Updated Item” and the “ItemCreatedChannel” value as “Power Automate”. And, once the value for the “ItemCreatedChannel” is updated to “Power Automate”, we cannot see the button “Click me to trigger this flow” anymore.
Summary: SharePoint Button to Trigger Power Automate Flow
Thus, in this article, we have learned the following with respect to “trigger flow for a selected item”:
- How to create a button in a SharePoint Online list or document library using the JSON format.
- How to get the flow ID from the Power Automate gallery
- How to trigger the Power Automate flow from the SharePoint button Click for a selected item.
Are you preparing for a SharePoint job interview?
You can refer to these exclusive interview questions and answers that will help you get into your high-paying dream job:
- 50+ Tricky SharePoint Online Interview Questions and How to Answer Them
- Top 50 Tricky Power Apps interview questions and answers for experienced – Part 2
- 50 Tricky Power Automate Interview Questions and How to Answer Them
- Top 50+ Power Apps interview questions and answers for experienced – Part 1
Buy SharePoint Online eBook
Buy the premium version of SharePoint Online & Office 365 administration eBook from here:
If you would like to appreciate our efforts, please like our post and share it with your colleagues and friends. You may join the email list; it won’t spam you; it’s just notifications of new posts coming in, nothing else. 🙂
About Post Author

Discover more from Global SharePoint
Subscribe to get the latest posts sent to your email.