![]()
In this “Power Automate create HTML table with dynamic link” article, we will learn how to use Power Automate to create a HTML table from an array variable, as well as how to create a dynamic hyperlink in the table using CSS styles.
Power Automate create HTML table with Dynamic Hyperlink
The Power Automate flow for this demo, which will generate an HTML table with a dynamic hyper link, is shown below.

Before getting into the explanation of the flow, we will learn how to enable Power Automate experimental features, because we have used this feature in this demo.
Enable Power Automate Experimental Features
Login to your Power Automate – Microsoft Power Automate
Click on the gear icon.
Click on the “View all Power Automate Settings” link.

Next follow the below steps:
- Choose display language: Choose display language from the list.
- Regional format (locale): The regional format you choose will determine the date and time formats for your language.
- Experimental Features: These features might change, break, or disappear at any time. Enable the toggle.
- Click on the Save button.

Power Automate flow to create HTML table with dynamic link – explanation
Step 1: Get file properties Power Automate (to get checked out files report)
Add a Get file properties action to retrieve all checked-out documents from the document library.

Notice that, after enabling the experimental features, we could see the filter query designer; before enabling it, it was not there.
In the filter query, add the following condition:
CheckoutUserId Does not equal to null
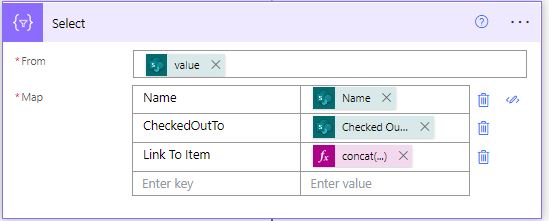
Step 2: using select in Power Automate (to map the needed columns)
Add a “Select” data compose operation action.
Add the “value” from the “Get file properties only” step. You can add the value directly, like below:
@{outputs('Get_files_(properties_only)')?['body/value']}

Notes:
- In the above mapping, we are just mapping the “File Name,” “Checked Out To,” and “Link To Item.”
- For the name and “Checked Out To,” directly select from the “Get file properties” result.
- For the Link to Item, construct the link as below, as we want to show how to create a hyperlink in the HTML table as well.
@{concat('<a href="', item()?['{Link}'], '">Link to item</a>')}
Notes:
- Below is the format to create a hyperlink in the HTML table:
concat('<a href="', [YourLink], '">[a meaningful text]</a>')
2. You can construct the dynamic link with a Title column or any other text column as well; below is an example of a Title column.
concat('<a href="', item()?['{Link}'], '">', item()?['Title'], '</a>')
Step 3: Create HTML table in Power Automate
Add a HTML Table data compose operation action, and in the “From” field, select the output from the previous compose operation “Select” step. You can pass the value directly as below:
@{body('Select')}

Step 4: Replace function in Power Automate (Replace HTML Table)
You need to add three compose data operation actions one by one and pass the value below the output from one compose operation as the next compose operation’s input.
1. replace(body('Create_HTML_table'),'<','<')
2. replace(body('Create_HTML_table'),'>','>')
3. replace(body('Create_HTML_table'),'"','"')
OR
All three steps can be achieved using a single compose operation using the below expression:
replace(replace(replace(body('Create_HTML_table'),'<','<'),'>','>'),'"','"')
Step 5: Replace function in Power Automate HTML table (To replace unwanted characters)
Add a compose data operation and add the below expression to it:
replace(replace(replace(body('Create_HTML_table'),'<','<'),'>','>'),'"','"')

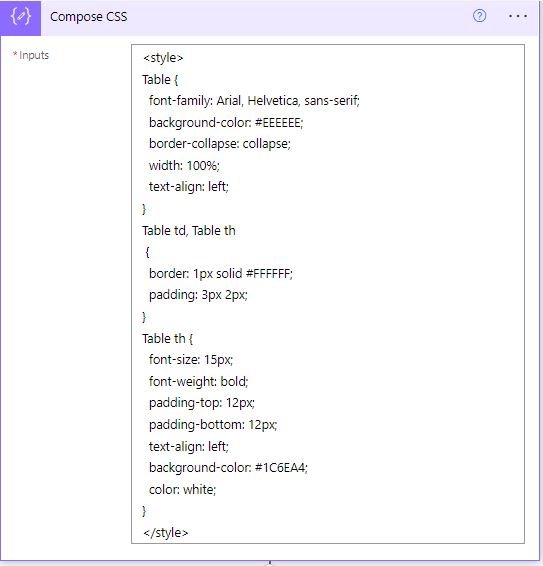
Step 6: Style HTML table in power automate (To apply CSS in the table)
Add a compose data operation action and pass the below CSS:
<style>
Table {
font-family: Arial, Helvetica, sans-serif;
background-color: #EEEEEE;
border-collapse: collapse;
width: 100%;
text-align: left;
}
Table td, Table th
{
border: 1px solid #FFFFFF;
padding: 3px 2px;
}
Table th {
font-size: 15px;
font-weight: bold;
padding-top: 12px;
padding-bottom: 12px;
text-align: left;
background-color: #1C6EA4;
color: white;
}
</style>

Note:
- You can design the table HTML and CSS using the table-styler.
Step 7: Combine a HTML table and CSS together into a single compose data operation.
Add a final compose action and pass the “Compose CSS” and “Compose – Replace HTML Table” outputs as input to this “Compose – Final Formatted Table.” You can pass these outputs in any order.

Send the “Compose – Final formatted table” output to your email.
Step 8: Email an HTML table with a link
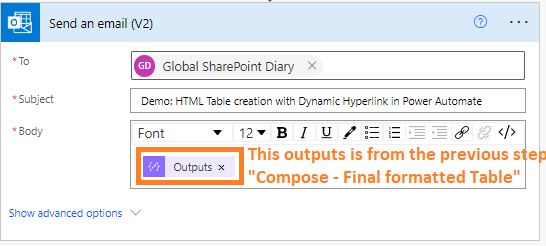
At the end, add a “Send an email (V2)” action to your flow.
In the “To” field, add your email ID.
In the subject, add some meaningful text.
Add the outputs “Compose – Final formatted table” to the body section.

HTML table with dynamic hyperlink in Power Automate Demo
Finally, run the Power Automate flow manually; you should see the following output:

Summary: Power Automate create HTML table with dynamic link
As a result of this article, we have learned the following about creating an HTML table with a dynamic hyperlink in Power Automate:
- How to create an HTML table with dynamic hyperlinks and send email
- How to use Get file properties Power Automate
- How to use the Replace function in a Power Automate HTML table
- How to enable the experimental features in Power Automate
See Also: Power Automate Tutorials
- You may visit the Power Automate articles hub

